I had a friend send me a link to a blog/website that was chock full of great ideas for feeding your babies and toddlers. I really didn't give it much thought other than, "Wow, wouldn't it be nice to be a stay-at-home Mom with all the time to devote to trying all these ideas and all the funds necessary to buy all these ingredients and be gorgeous and a former model".
I was looking for some recipes for toddlers and came across the same website again and when I looked at it through new "eyes" I really liked what I saw!
The website is called Weelicious and it's got a ton of really great recipes for not only your toddler/baby but also the entire family.
You must check it out - I know I'm inspired to expand Parker's culinary horizons.
Showing posts with label recipes. Show all posts
Showing posts with label recipes. Show all posts
Wednesday, August 25, 2010


Tuesday, August 24, 2010
Recipe Time!!! Crustless Spinach Quiche
Since I'm on this new way of thinking about eating and embarking on my lifestyle change....I've been looking for things I can make for breakfast that are fast and easy and something I can pack ahead of time for work. I found this recipe and it completely fits the bill for me!
It's a crustless quiche, so it fits in with my low carb attitude. It's filled with good stuff so it makes me feel happy and it's also filled with spinach which is yummy and helps keep the inside happy and full!
Crustless Spinach Quiche
5 eggs, beaten
1 10-oz package frozen, chopped spinach, thawed
2 cups reduced fat shredded sharp cheddar cheese
16 oz reduced fat cottage cheese (small curd if you can find it)
1 bunch of green onions (sliced thin, only white and light green parts)
Prehead oven to 350 degrees. Prepare a 9 inch pie plate or cake pan by spraying it with Pam.
Squeeze the spinach in a clean kitchen towel to remove all the water. Add it to a large mixing bowl, separating it into pieces. Add the beaten eggs, cheese, cottage cheese and onions. Also, add salt, pepper and garlic powder to taste. Mix everything well and then pour into prepared pan.
Bake in the oven for about 45 min or until eggs are set.
This is such an awesome recipe. I hope you get a chance to try it soon!
It's a crustless quiche, so it fits in with my low carb attitude. It's filled with good stuff so it makes me feel happy and it's also filled with spinach which is yummy and helps keep the inside happy and full!
Crustless Spinach Quiche
5 eggs, beaten
1 10-oz package frozen, chopped spinach, thawed
2 cups reduced fat shredded sharp cheddar cheese
16 oz reduced fat cottage cheese (small curd if you can find it)
1 bunch of green onions (sliced thin, only white and light green parts)
Prehead oven to 350 degrees. Prepare a 9 inch pie plate or cake pan by spraying it with Pam.
Squeeze the spinach in a clean kitchen towel to remove all the water. Add it to a large mixing bowl, separating it into pieces. Add the beaten eggs, cheese, cottage cheese and onions. Also, add salt, pepper and garlic powder to taste. Mix everything well and then pour into prepared pan.
Bake in the oven for about 45 min or until eggs are set.
This is such an awesome recipe. I hope you get a chance to try it soon!
Tuesday, October 13, 2009
Recipe time!!! Toffee Chocolate Chip Cookies

I was online looking for a good cookie recipe and this seemed to fit the bill. I modified the original recipe a little bit and it resulted in a chewy yet crispy cookie that is just perfect!!!
Here is your cast of characters, ultimately I did end up using 1/2 cup butter and 1/2 cup shortening :
Here is your cast of characters, ultimately I did end up using 1/2 cup butter and 1/2 cup shortening :

Toffee Chocolate Chip Cookies
1 cup packed dark brown sugar
1 cup butter, softened (or you can use 1/2 C butter and 1/2 C shortening)
1/4 cup white sugar
1 egg
1 teaspoon vanilla extract
2 cups all-purpose flour
1 teaspoon baking soda
1/2 teaspoon baking powder
1/4 teaspoon salt
3 cups semi-sweet chocolate chips
1 (8 ounce) package heath bar chips
1 cup butter, softened (or you can use 1/2 C butter and 1/2 C shortening)
1/4 cup white sugar
1 egg
1 teaspoon vanilla extract
2 cups all-purpose flour
1 teaspoon baking soda
1/2 teaspoon baking powder
1/4 teaspoon salt
3 cups semi-sweet chocolate chips
1 (8 ounce) package heath bar chips
Preheat oven to 350 degrees F (175 degrees C).
Mix sugars, margarine and shortening until light and fluffy.

Mix in egg and vanilla. Stir in flour, baking soda, baking powder and salt. Stir in chocolate chips and heath bar chips.


Mix in egg and vanilla. Stir in flour, baking soda, baking powder and salt. Stir in chocolate chips and heath bar chips.

Drop dough by rounded teaspoons onto ungreased cookie sheet. Make 9-10 minutes until lightly brown.


These are some of the best cookies I've ever tasted. I hope that you make them soon and enjoy them with an ice cold glass of milk!

Laura
Tuesday, July 7, 2009
Recipe Time!! Mediterranean Couscous Salad
One Sunday evening I got really industrious and worked away in the kitchen making three salads/salsas for the week's dinners and lunches. One was a brand new one for me and one I completely made up on the fly. I have since worked with the dressing element of the salad and feel that it's now perfecto! I hope you enjoy trying this out!
Mediterranean Couscous Salad
1 cup dried couscous prepared according to package directions and cooled
3 Roma/plum tomatoes, seeded and diced
1 medium red onion, diced
2 english cucumbers, quartered, seeds removed and diced
1 bunch flat leaf parsley, chopped well
1 8oz container feta cheese crumbles
In a large mixing bowl stir all of the ingredients above together until mixed well.
Dressing:
Juice of three lemons
Zest of one lemon
1 tsp minced garlic (I use the jarred kind)
1 tsp kosher salt
1/2 tsp black pepper
1/3 cup olive oil
Whisk all these ingredients until thoroughly combined and then pour over the couscous mixture. Stir well until the vinaigrette is well incorporated. Cover and refrigerate for an hour before serving.
Mediterranean Couscous Salad
1 cup dried couscous prepared according to package directions and cooled
3 Roma/plum tomatoes, seeded and diced
1 medium red onion, diced
2 english cucumbers, quartered, seeds removed and diced
1 bunch flat leaf parsley, chopped well
1 8oz container feta cheese crumbles
In a large mixing bowl stir all of the ingredients above together until mixed well.
Dressing:
Juice of three lemons
Zest of one lemon
1 tsp minced garlic (I use the jarred kind)
1 tsp kosher salt
1/2 tsp black pepper
1/3 cup olive oil
Whisk all these ingredients until thoroughly combined and then pour over the couscous mixture. Stir well until the vinaigrette is well incorporated. Cover and refrigerate for an hour before serving.
Tuesday, May 12, 2009
Recipe Time! Easy Key Lime Pie
I was over at my sister-in-law's house this weekend to celebrate Mother's Day and Shooter's birthday and of course we indulged in the most amazing food! We had the traditional family burgers which were awesome and this really great black bean salad. My mother-in-law made Shooter's favorite pound cake and then my sister-in-law made this wonderfully light and delicious key lime pie. Immediately I knew I had to have the recipe! And I shall share with each of you. :-)
Butter Crunch Crust
1/2 C softened butter
1/4 C packed brown sugar (light)
1 C all purpose flour
1/2 C chopped almonds
Combine butter, brown sugar, flour and nuts and place in a 9x13 baking pan. Bake at 400 degrees for 12-15 min or until golden brown. Remove from oven and stir at once. Quickly press crumbs against the bottom and sides of a 9 in ch pie plate. Cool. Reserve a few crumbs for top of pie.
Butter Crunch Crust
1/2 C softened butter
1/4 C packed brown sugar (light)
1 C all purpose flour
1/2 C chopped almonds
Combine butter, brown sugar, flour and nuts and place in a 9x13 baking pan. Bake at 400 degrees for 12-15 min or until golden brown. Remove from oven and stir at once. Quickly press crumbs against the bottom and sides of a 9 in ch pie plate. Cool. Reserve a few crumbs for top of pie.
Easy Key Lime Pie
Butter Crunch Crust (recipe above)
1 can sweetened condensed milk
1/3 cup + 1 Tbs Nellie and Joe's key lime juice
1 small container Cool-Whip (thawed)
Combine condensed milk, lime juice and whipped topping. Stir until well blended. Pour into cooled pie shell and top with reserved crumbs. Refrigerate for at least two hours before serving.
Now, go forth and enjoy this creamy tart deliciousness!
L.
Wednesday, April 8, 2009
Recipe Time! Buttermilk Baked Chicken
Well, now that the kitchen has started to make it's way back to a normal state, I can get back to cooking.
I didn't realize how much I enjoyed cooking until I had a kitchen that was out of commission and we were forced to go out or get takeout. I feel so much better when I can decompress over the simple tasks of creating a meal.
Last night, I adapted a recipe from Southern Living All-Time Favorite Recipes, Volume I.
Buttermilk Baked Chicken
(adapted from Southern Living All-Time Favorite Recipes, Volume I)
4 skinless, bone in chicken breasts
1 quart buttermilk, divided
5 dashes of hot sauce
2 cans cream of mushroom soup
1 small can of sliced mushrooms
1 cup flour
1 tsp salt, divided
1 tsp pepper, divided
1 tsp garlic powder, divided
Measure 1 1/2 cups of buttermilk and place it to the side. Place the chicken breasts in a ziploc bag and then cover with the rest of the buttermilk and 5 dashes of hot sauce. Allow chicken to marinate in the buttermilk/hot sauce for 6-8 hours.
When ready to bake, preheat oven to 425 degrees. Combine flour, 1/2 tsp salt, 1/2 tsp pepper and 1/2 tsp garlic powder and stir well. Dredge each well drained chicken breast through the flour and then place breast side down in a greased baking dish.
Bake chicken breasts for 25 minutes. Turn chicken over and bake for 15 minutes more. Combine the 1 1/2 cups of buttermilk, the cream of mushroom soup, 1/2 tsp salt, 1/2 tsp pepper and 1/2 tsp garlic powder and stir well to combine. Pour over chicken and then back for 15 minutes more, or until chicken is no longer pink. Cover with aluminum foil if needed to prevent over browning.
Shooter and I had this with some leftover jasmine rice and he had salad and I had sugar snap peas. This was delicous and incredibly easy! I definitely recommend that you try this out!
I didn't realize how much I enjoyed cooking until I had a kitchen that was out of commission and we were forced to go out or get takeout. I feel so much better when I can decompress over the simple tasks of creating a meal.
Last night, I adapted a recipe from Southern Living All-Time Favorite Recipes, Volume I.
Buttermilk Baked Chicken
(adapted from Southern Living All-Time Favorite Recipes, Volume I)
4 skinless, bone in chicken breasts
1 quart buttermilk, divided
5 dashes of hot sauce
2 cans cream of mushroom soup
1 small can of sliced mushrooms
1 cup flour
1 tsp salt, divided
1 tsp pepper, divided
1 tsp garlic powder, divided
Measure 1 1/2 cups of buttermilk and place it to the side. Place the chicken breasts in a ziploc bag and then cover with the rest of the buttermilk and 5 dashes of hot sauce. Allow chicken to marinate in the buttermilk/hot sauce for 6-8 hours.
When ready to bake, preheat oven to 425 degrees. Combine flour, 1/2 tsp salt, 1/2 tsp pepper and 1/2 tsp garlic powder and stir well. Dredge each well drained chicken breast through the flour and then place breast side down in a greased baking dish.
Bake chicken breasts for 25 minutes. Turn chicken over and bake for 15 minutes more. Combine the 1 1/2 cups of buttermilk, the cream of mushroom soup, 1/2 tsp salt, 1/2 tsp pepper and 1/2 tsp garlic powder and stir well to combine. Pour over chicken and then back for 15 minutes more, or until chicken is no longer pink. Cover with aluminum foil if needed to prevent over browning.
Shooter and I had this with some leftover jasmine rice and he had salad and I had sugar snap peas. This was delicous and incredibly easy! I definitely recommend that you try this out!
Friday, March 20, 2009
Recipe time!! Ricotta Gnocchi
I have touted the wonderfulness that is Allrecipes.com on this blog before. I adore the website and have found many wonderful recipes on there. I get a daily recipe from them by email and sometimes I don't even give them a second glance and other times they immediately scream, "make this dish!" Such was the reaction to the Ricotta Gnocchi recipe that showed up on Saturday morning.
Here's the recipe and then I'll explain how I adapted it:
Ricotta Gnocchi
1 (8 ounce) container ricotta cheese
2 eggs
1/2 cup freshly grated Parmesan cheese
1 teaspoon salt
1 teaspoon pepper
1 teaspoon garlic powder
1 cup all-purpose flour, or as needed
Stir together the ricotta cheese, eggs, Parmesan Cheese, salt, pepper, and garlic powder in a large bowl until evenly combined. Mix in 1 cup of flour. Add additional flour if needed to form a soft dough.
Divide the dough into 3 or 4 pieces, and roll into 1/2-inch-thick ropes on a floured surface. Cut each rope into 1-inch pieces, and place on a lightly floured baking sheet. Place in the refrigerator until ready to use.
Bring a large pot of lightly salted water to a boil over high heat. Boil the gnocchi until they float to the surface, 1 to 2 minutes, then drain. Serve with your favorite sauce.
First, I added way more ricotta than I was supposed to. I measured out 1 cup and then looked at my container and ended up adding probably two cups to the two eggs and 1/2 cup parmesan cheese. I also added in about a tablespoon of dried italian seasoning to the gnocchi. I also probably added an additional cup to cup and a half of flour - and I only had 1 cup of regular flour so the rest was whole wheat flour. I essentially doubled the recipe but that's okay because now I have some in the freezer for another time.
Also, we made this with mild italian sausage...I browned the sausages first on all sides and then sliced them and added them back to the pan to finish cooking. Once they were finished I added in the cooked gnocchi to the sausage just to give the gnocchi a little color. Separately I was heating up a jarred vodka sauce I bought from Bertolli and brought it up to temperature. I plated the sausage and gnocchi combo and then topped with the sauce. It was delish, my lovelies! Do try this out...it's easy but kinda labor intensive so making a double batch like I did is better in the long run so that you have some on hand for quick meals.
L.
Here's the recipe and then I'll explain how I adapted it:
Ricotta Gnocchi
1 (8 ounce) container ricotta cheese
2 eggs
1/2 cup freshly grated Parmesan cheese
1 teaspoon salt
1 teaspoon pepper
1 teaspoon garlic powder
1 cup all-purpose flour, or as needed
Stir together the ricotta cheese, eggs, Parmesan Cheese, salt, pepper, and garlic powder in a large bowl until evenly combined. Mix in 1 cup of flour. Add additional flour if needed to form a soft dough.
Divide the dough into 3 or 4 pieces, and roll into 1/2-inch-thick ropes on a floured surface. Cut each rope into 1-inch pieces, and place on a lightly floured baking sheet. Place in the refrigerator until ready to use.
Bring a large pot of lightly salted water to a boil over high heat. Boil the gnocchi until they float to the surface, 1 to 2 minutes, then drain. Serve with your favorite sauce.
First, I added way more ricotta than I was supposed to. I measured out 1 cup and then looked at my container and ended up adding probably two cups to the two eggs and 1/2 cup parmesan cheese. I also added in about a tablespoon of dried italian seasoning to the gnocchi. I also probably added an additional cup to cup and a half of flour - and I only had 1 cup of regular flour so the rest was whole wheat flour. I essentially doubled the recipe but that's okay because now I have some in the freezer for another time.
Also, we made this with mild italian sausage...I browned the sausages first on all sides and then sliced them and added them back to the pan to finish cooking. Once they were finished I added in the cooked gnocchi to the sausage just to give the gnocchi a little color. Separately I was heating up a jarred vodka sauce I bought from Bertolli and brought it up to temperature. I plated the sausage and gnocchi combo and then topped with the sauce. It was delish, my lovelies! Do try this out...it's easy but kinda labor intensive so making a double batch like I did is better in the long run so that you have some on hand for quick meals.
L.
Tuesday, March 17, 2009
Recipe time!! Chicken Rollups
Shooter and I were holed up this weekend with sickness abounding at the house. First me and then he got it. First time it's happened that way in a while. We were laying in bed on Sunday morning watching Food Network, and Robin Miller made this interesting chicken rollup dish. I had to modify her version because I just knew it wouldn't work for us...we're not big goat cheese fans in our house.

Look at that filling...oh my it was delicious!!!! Salty from the ham and all cheesy goodness.

Oh...and look at that crispiness that is that coating. I have about decided that the only breadcrumbs I'm every going to use are panko breadcrumbs. These were so crunchy and yummy!

We had this with some brown/wild rice mix and a salad. It was super yummy! I'll definitely be adding this into my recipe rotation!
Here's my version:
Chicken Rollups
4 boneless, skinless chicken breasts
4-8 pieces of deli ham
1 package of frozen chopped spinach, thawed and drained well1 container of herb and garlic cheese spread (I used Alouette, 6.5 oz)
salt and pepper to taste
dijon mustard
panko breadcrumbs
Put each chicken breast between a piece of plastic wrap and pound until about 1/2 an inch thick. Once all the chicken is pounded out, top each one with 1-2 slices of ham - depends on how big your chicken is and how big your ham slices are. In a small bowl, combine the spinach and the cheese and mix until thoroughly combined. Spread that mixture over the ham on each chicken breast. Starting at the small end of the breast, roll each piece of chicken up and secure with toothpicks. Once all pieces of chicken are rolled up and secured, paint them with dijon mustard until coated well and then dip into panko bread crumbs until thoroughly coated. Spray the bottom of an 9x13 casserole dish with nonstick cooking spray and place the
rolls seam side down. Spray the tops with a little additional nonstick cooking spray. Bake at 350 degrees for about 30-45 minutes until cooked through.
rolls seam side down. Spray the tops with a little additional nonstick cooking spray. Bake at 350 degrees for about 30-45 minutes until cooked through.

Look at that filling...oh my it was delicious!!!! Salty from the ham and all cheesy goodness.

Oh...and look at that crispiness that is that coating. I have about decided that the only breadcrumbs I'm every going to use are panko breadcrumbs. These were so crunchy and yummy!

We had this with some brown/wild rice mix and a salad. It was super yummy! I'll definitely be adding this into my recipe rotation!
L.
Edit: We also used this super awesome yummy deli meat from Hormel that is all natural with no preservatives, artificial ingredients of MSG...also no nitrites or nitrates! Try it out. The ham and the salami are to die for!!
Wednesday, March 4, 2009
Recipe Time!! Oven Baked Catfish
My Mom recently came to visit with a Southern Living recipe magazine with her. I am generally infatuated with all things Southern Living like most good Southern Ladies. ;-)
There were so many delicious looking recipes that I had to go and buy it for myself. This weekend Shooter and I decided we'd give several a try for our meals this week and here's my adaptation of one of them.
Oven Baked Catfish
adapted from Southern Living's "Spicy Fried Catfish with Lemon Cream"
4 catfish fillets
1/4 teaspoon salt
1 1/2 cups panko breadcrumbs
1/4 teaspoon garlic powder
1/4 teaspoon ground red pepper
3 egg whites
Vegetable cooking spray
Season the catfish evenly with salt and black pepper. Set aside.
Combine breadcrumbs, salt, garlic powder, and ground red pepper in a shallow bowl.
Whisk egg whites in a shallow bowl until frothy. Dip fillets in egg whites, and dredge in breadcrumb mixture.
Arrange fillets on a wire rack coated with cooking spray in an aluminum foil-lined 15- x 10-inch jellyroll pan. (Do not overlap fillets.) Lightly coat fillets evenly on both sides with cooking spray.
Bake at 375° for 25 to 30 minutes or until fish is golden brown.
Lemon Cream
12 oz light sour cream
2 tablespoons chopped fresh parsley
Grated rind of one lemon
Juice of one lemon
1/4 teaspoon salt
1/4 cup finely minced red onion
Stir together all ingredients until blended. Cover and chill until ready to eat.
I have to tell you that it's worth the specal trip to get the Panko bread crumbs. They make this fish taste so crispy and crunchy!
Also, the leftover fish and sauce make delicious fish tacos the next day for lunch. :-)
This is going into our regular rotation and we also decided that we'd like to try it with tilapia too.
L.
There were so many delicious looking recipes that I had to go and buy it for myself. This weekend Shooter and I decided we'd give several a try for our meals this week and here's my adaptation of one of them.
Oven Baked Catfish
adapted from Southern Living's "Spicy Fried Catfish with Lemon Cream"
4 catfish fillets
1/4 teaspoon salt
1 1/2 cups panko breadcrumbs
1/4 teaspoon garlic powder
1/4 teaspoon ground red pepper
3 egg whites
Vegetable cooking spray
Season the catfish evenly with salt and black pepper. Set aside.
Combine breadcrumbs, salt, garlic powder, and ground red pepper in a shallow bowl.
Whisk egg whites in a shallow bowl until frothy. Dip fillets in egg whites, and dredge in breadcrumb mixture.
Arrange fillets on a wire rack coated with cooking spray in an aluminum foil-lined 15- x 10-inch jellyroll pan. (Do not overlap fillets.) Lightly coat fillets evenly on both sides with cooking spray.
Bake at 375° for 25 to 30 minutes or until fish is golden brown.
Lemon Cream
12 oz light sour cream
2 tablespoons chopped fresh parsley
Grated rind of one lemon
Juice of one lemon
1/4 teaspoon salt
1/4 cup finely minced red onion
Stir together all ingredients until blended. Cover and chill until ready to eat.
I have to tell you that it's worth the specal trip to get the Panko bread crumbs. They make this fish taste so crispy and crunchy!
Also, the leftover fish and sauce make delicious fish tacos the next day for lunch. :-)
This is going into our regular rotation and we also decided that we'd like to try it with tilapia too.
L.
Sunday, February 1, 2009
Yummy and Quick Homemade Barbecue Sauce
So, I ended up at home on Friday - sick. Yea, this pregnancy thing has it's not so fine points. One of them is your overactive mucous membranes. In laymans terms it means I'm full of snot. Normally I'm okay handling the snot but when you start come down with a cold it just makes things all that much worse. That was me on Friday. Snot everywhere and sinuses clogged solid.
How does that happen anyway?? How can your nose run like a river yet be clogged so solidly you can't breathe? That's one of those questions I'll ask God when I get to Heaven, cause it really has me stumped.
So, I'm at home on Friday and I have 5 chicken breasts in the fridge that need to be cooked...so I think, self, let's do barbecue chicken! So I shuffle to the fridge and to my amazement we have no barbecue sauce! I can't fathom that. Well, that puts me on a search for a recipe for barbecue sauce because I know I have all the items to make it.
I checked my regular standbys, Allrecipes.com and Food Network, only to be really disappointed with what I found. Then I found out that my Cooks Illustrated registration has expired and I wasn't in the mood to extend it. So my next stop was Recipezaar, which is an amazing site if you have a few ingredients and are looking for a recipe to use them. There I found a great recipe for a homemade barbecue sauce that looked very similar to one my Mom used to make.
Quick Barbecue Sauce
1/2 cup onion, finely chopped
2 tsp minced garlic
2 cup ketchup
1/2 cup brown sugar, firmly packed
1/2 cup lemon juice
2 tablespoons lemon juice
2 tablespoons worcestershire sauce
3 teaspoons prepared mustard
1/4 tsp hot pepper sauce
In small saucepan, cook onion and garlic in margarine until tender. Add remaining ingredients; bring to a boil. Reduce heat; simmer uncovered 15 to 20 minutes.
For my barbecue chicken, I just lined a baking dish with aluminum foil and then salted and peppered the chicken breasts. I then spooned the barbecue sauce over the chicken breasts, both sides, then covered the dish with aluminum foil and baked them for about an hour at 350 degrees. I served it with some rice and a corn and cherry tomato salad that I'd made earlier in the week. So Yummy!!!!
L.
How does that happen anyway?? How can your nose run like a river yet be clogged so solidly you can't breathe? That's one of those questions I'll ask God when I get to Heaven, cause it really has me stumped.
So, I'm at home on Friday and I have 5 chicken breasts in the fridge that need to be cooked...so I think, self, let's do barbecue chicken! So I shuffle to the fridge and to my amazement we have no barbecue sauce! I can't fathom that. Well, that puts me on a search for a recipe for barbecue sauce because I know I have all the items to make it.
I checked my regular standbys, Allrecipes.com and Food Network, only to be really disappointed with what I found. Then I found out that my Cooks Illustrated registration has expired and I wasn't in the mood to extend it. So my next stop was Recipezaar, which is an amazing site if you have a few ingredients and are looking for a recipe to use them. There I found a great recipe for a homemade barbecue sauce that looked very similar to one my Mom used to make.
Quick Barbecue Sauce
1/2 cup onion, finely chopped
2 tsp minced garlic
2 cup ketchup
1/2 cup brown sugar, firmly packed
1/2 cup lemon juice
2 tablespoons lemon juice
2 tablespoons worcestershire sauce
3 teaspoons prepared mustard
1/4 tsp hot pepper sauce
In small saucepan, cook onion and garlic in margarine until tender. Add remaining ingredients; bring to a boil. Reduce heat; simmer uncovered 15 to 20 minutes.
For my barbecue chicken, I just lined a baking dish with aluminum foil and then salted and peppered the chicken breasts. I then spooned the barbecue sauce over the chicken breasts, both sides, then covered the dish with aluminum foil and baked them for about an hour at 350 degrees. I served it with some rice and a corn and cherry tomato salad that I'd made earlier in the week. So Yummy!!!!
L.
Thursday, January 29, 2009
Shrimp and Pasta to knock your socks off
My mother shakes her head at me when I talk about how I come up with some of my recipes. To be honest, I hate following recipes. I like looking at a recipe and seeing where I can tweak it to make it more tasty or more my style. Take for instance this Shrimp Scampi recipe that I found at Allrecipes.com. It's a good recipe in theory. But it's missing something in my opinion. So I played with it and this is what I came up with.
Laura's Shrimp and Pasta
1 pound of linguine
6 tablespoons butter
2 tsp minced garlic (again, I use the jar kind)
1/2 tsp red pepper flakes
1/2 tsp salt
1/4 tsp black pepper
1/2 tsp italian seasoning
1 pound peeled and deveined shrimp, tails removed
juice of one lemon
Put your linguine on to boil, cook for 8-10 min until al dente.
While the pasta is cooking, melt your butter over low heat with the garlic. Once the butter is melted, turn up the heat to medium and add the red pepper flakes, salt, black pepper and italian seasoning. Stir constantly so that flavors infuse the butter.
Add in shrimp and cook until just curled and pink. Stir in the lemon juice and then remove the shrimp from the pan. Add in your pasta and stir until all the pasta is coated with the sauce then plate. Add shrimp to each serving.
If I had any one wish, it would be for people to not be intimidated by recipes. Cooking is one of those things that just takes practice and after a while you just get a sense for ingredients that go together.
L.
Laura's Shrimp and Pasta
1 pound of linguine
6 tablespoons butter
2 tsp minced garlic (again, I use the jar kind)
1/2 tsp red pepper flakes
1/2 tsp salt
1/4 tsp black pepper
1/2 tsp italian seasoning
1 pound peeled and deveined shrimp, tails removed
juice of one lemon
Put your linguine on to boil, cook for 8-10 min until al dente.
While the pasta is cooking, melt your butter over low heat with the garlic. Once the butter is melted, turn up the heat to medium and add the red pepper flakes, salt, black pepper and italian seasoning. Stir constantly so that flavors infuse the butter.
Add in shrimp and cook until just curled and pink. Stir in the lemon juice and then remove the shrimp from the pan. Add in your pasta and stir until all the pasta is coated with the sauce then plate. Add shrimp to each serving.
If I had any one wish, it would be for people to not be intimidated by recipes. Cooking is one of those things that just takes practice and after a while you just get a sense for ingredients that go together.
L.
Tuesday, January 27, 2009
Lunchtime (or anytime) deliciousness!
Yummmm.....Okay....I just have to share another recipe that I found and then tweaked to make my own this weekend. I have been looking for "salad" type recipes that I can take to work and easily make into a mini meal. This one fits the bill perfectly!!!! It's easy to make and it's absolutely delicious too.
Mediterranean Chick Pea Salad
2 16 oz cans of chick peas (garbanzo beans), drained and rinsed
1 English cucumber (the long seedless guys), chopped
1 small sweet onion, minced
2 Roma Tomatoes, seeded and diced
1/2 of a red bell pepper, diced
2 cloves of minced garlic (or 1 tsp of the jarred garlic, which is what I use)
1 bunch of flat leaf parsley, chopped
Juice of two lemons
1 tablespoon red wine vinegar
salt and pepper to taste (I probably used 2 tsp salt and 1 tsp pepper)
1 tsp dried oregano
3 tablespoons olive oil
Mix everything together and then let it sit in the fridge until it's well chilled and the flavors have come together.
This week it's not only a salad for lunch but it's also going to be served with some baked tilapia for dinner. :-)
Later lovelies!
L.
Mediterranean Chick Pea Salad
2 16 oz cans of chick peas (garbanzo beans), drained and rinsed
1 English cucumber (the long seedless guys), chopped
1 small sweet onion, minced
2 Roma Tomatoes, seeded and diced
1/2 of a red bell pepper, diced
2 cloves of minced garlic (or 1 tsp of the jarred garlic, which is what I use)
1 bunch of flat leaf parsley, chopped
Juice of two lemons
1 tablespoon red wine vinegar
salt and pepper to taste (I probably used 2 tsp salt and 1 tsp pepper)
1 tsp dried oregano
3 tablespoons olive oil
Mix everything together and then let it sit in the fridge until it's well chilled and the flavors have come together.
This week it's not only a salad for lunch but it's also going to be served with some baked tilapia for dinner. :-)
Later lovelies!
L.
Friday, January 16, 2009
Black Bean and Corn Salsa
Okay...I have no pictures of this cause I wasn't quite myself yet when I made this and didn't snap pics like I said I would. I know I will make this again, though, and I will definitely take pics.
Black Bean and Corn Salsa
2 cans of black beans, rinsed and drained
2 cans of whole kernel corn, rinsed and drained
1 pint of grape tomatoes, halved
1 bunch of cilantro, chopped
1 medium red onion, diced
2 serrano peppers, ribs and seeds removed, diced finely
1 tsp salt
1 tsp ground cumin
1 tsp garlic powder
juice from 3 medium limes
Mix everything together and let chill. It's great with tortilla chips or served over burritos. I personally like to eat it straight up. Any way you eat it, you'll love it!
Later lovelies!
L.
Black Bean and Corn Salsa
2 cans of black beans, rinsed and drained
2 cans of whole kernel corn, rinsed and drained
1 pint of grape tomatoes, halved
1 bunch of cilantro, chopped
1 medium red onion, diced
2 serrano peppers, ribs and seeds removed, diced finely
1 tsp salt
1 tsp ground cumin
1 tsp garlic powder
juice from 3 medium limes
Mix everything together and let chill. It's great with tortilla chips or served over burritos. I personally like to eat it straight up. Any way you eat it, you'll love it!
Later lovelies!
L.
Wednesday, January 14, 2009
Stir Fried Vegetables - So yummy for your tummy!
So, I made a stir fry again tonight for supper - we had the same one last week and it was so good Shooter requested it again. I, of course, obliged because it's super easy and super healthy for us.


 I hope you try this out...trust me, it's easy, it's fast, it's delicious and most of all it's good for you!
I first started out by cutting up an onion into big chunks.
Then I cut up my bell pepppers. Shooter and I are not big fans of green bell peppers so I use red and yellow ones. I prefer their flavor but they also lend a good bit of color to the dish. I slice them up into pieces.
Then I clean and set aside the snow peas and mushrooms.
We also love soybean sprouts. I prefer them to water chestnuts, but you could easily substitute water chestnuts if you prefer. They give the same kind of crunchiness to the dish.
Now, I get my "wok" ready - I heat it on high heat with about a tablespoon of oil in the pan. I use vegetable oil for this dish.
Once the pan is hot, I add in the onions and let them cook for about 3-4 minutes. They go in first because I want them cooked through a little more than the rest of the veggies.
Now I add in the peppers and the snow peas. They take a little longer to cook than the mushrooms and the sprouts so they go in first. I let them cook for about 3 minutes.
Now I add in the mushrooms and the sprouts. At this point I also add in about a tablespoon of Ponzu sauce. Ponzu sauce is like soy sauce but it tastes fruitier - more citrusy. :-D I'm making this all up ya know. hehehe!
After about a minute I add in about two tablespoons of a stir fry sauce I bought at the grocery. It's random - I usually buy whatever looks good to me that day. This one is kinda spicy and we like it lots. I let it go for another minute and if the sauce is still kinda loose (i.e. runny) then I'll mix a tablespoon of flour with a tablespoon of Ponzu and add that to the pan. That will help thicken it up for us.
Also, I added chicken into the stir fry this time....I don't always do this. Before I started the veggies I browned the chicken and the set it off to the side to hang out until the veggies were ready. Then I added the chicken back in to warm through.
In the meantime, I usually make up a pot of Jasmine rice. Oh lover of my soul...I adore Jasmine rice!!!!! I prepare it according to the package directions but add a tablespoon of rice wine vinegar to the water. It adds a little zing that I like with my stir fry. This time, however, I forgot to get it started and we ate the stir fry riceless. It was good, but I recommend rice.
Now...this is all for me....and only me....excuse me.....
*burp* Wow that was good!!
I hope you try this out...trust me, it's easy, it's fast, it's delicious and most of all it's good for you!Later lovelies!
L.
Monday, January 12, 2009
Baked Shrimp with Tomatoes and Feta
Saturday morning/afternoon I was lazily doing laundry - watching my fave Food Network shows and also my fave PBS cooking shows. Around 12pm Everyday Food comes on PBS and normally I don't watch it, but there was nothing else good on. They showcased some easy and fast dishes for weeknight meals.
One that stood out to me was one called Baked Shrimp with Tomatoes and Feta. One of Shooter's favorite dishes is from a restaurant here in Atlanta called Kyma. It's a greek restaurant that features whole shrimp baked in a savory tomato sauce and sprinkled with crumbled feta. He adores that dish! In an effort to cook healthier and also get my seafood requirements in, I thought I'd try it out.
You should too! It's easy and oh so delicious!
 After prepping everything you saute the garlic, oregano, scallions and tomatoes until soft and the liquid has evaporated. It makes it all sooooo yummy!
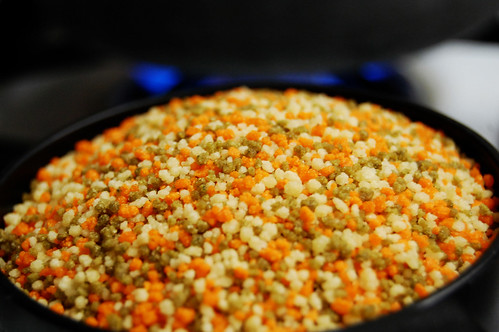 The recipe called for serving the dish with orzo and green beans but I thought serving it with couscous would be authentically Mediterranean. It was delicious and soaked up the yummy broth created when the shrimp and tomatoes baked.
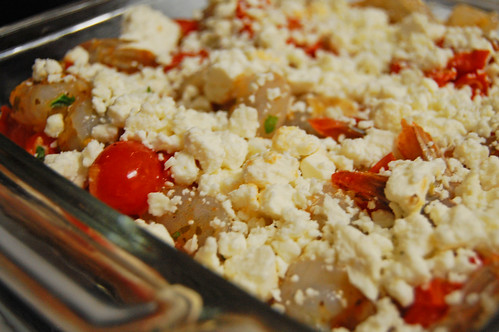 Here is the baking dish with everything assembled...looks good enough to eat already, eh?
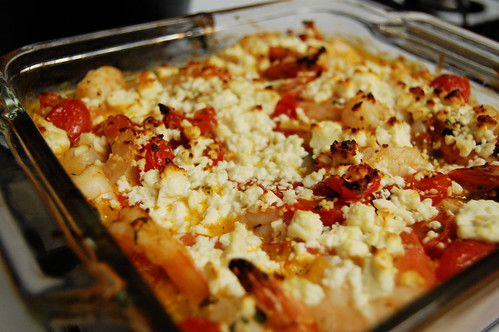 Oh, come to me lover of my soul....here is the final product fresh from the oven. The cheese is all melty and browned. It's all bubbly and luscious.
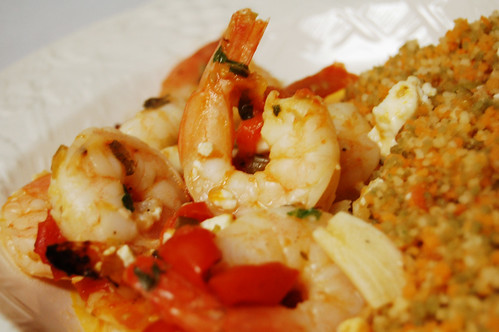 And here's my plate...it was soooo tasty...*burp*
Serves 4
2 tablespoons olive oil
4 thinly sliced scallions
4 garlic cloves, thinly sliced
2 teaspoons dried oregano
2 pints cherry tomatoes, halved
Coarse salt and ground pepper
1 1/2 pounds peeled and deveined large frozen shrimp, thawed, tails removed
2 tablespoons chopped fresh fresh mint, plus more for garnish
4 ounces feta cheese
Directions
Preheat oven to 475 degrees with rack set in upper third. Heat oil in a large skillet over medium. Add scallions, garlic, and oregano; cook, stirring, until fragrant, about 1 minute.
Add tomatoes. Cook over medium, stirring occasionally, until no liquid remains in skillet, 10 to 15 minutes. Season with salt and pepper.
Add shrimp and mint to skillet. Stir to combine; transfer to an 8-inch square (or other shallow 2-quart) baking dish. Crumble feta over top.
Bake until liquid is bubbling, cheese is beginning to brown, and shrimp in center of dish are opaque, 15 to 20 minutes.
One that stood out to me was one called Baked Shrimp with Tomatoes and Feta. One of Shooter's favorite dishes is from a restaurant here in Atlanta called Kyma. It's a greek restaurant that features whole shrimp baked in a savory tomato sauce and sprinkled with crumbled feta. He adores that dish! In an effort to cook healthier and also get my seafood requirements in, I thought I'd try it out.
You should too! It's easy and oh so delicious!
After prepping everything you saute the garlic, oregano, scallions and tomatoes until soft and the liquid has evaporated. It makes it all sooooo yummy! The recipe called for serving the dish with orzo and green beans but I thought serving it with couscous would be authentically Mediterranean. It was delicious and soaked up the yummy broth created when the shrimp and tomatoes baked.Here is the baking dish with everything assembled...looks good enough to eat already, eh? Oh, come to me lover of my soul....here is the final product fresh from the oven. The cheese is all melty and browned. It's all bubbly and luscious. And here's my plate...it was soooo tasty...*burp*And now, here's the recipe:
Baked Shrimp with Tomatoes and Feta
Courtesy of Everyday Food
Serves 4
2 tablespoons olive oil
4 thinly sliced scallions
4 garlic cloves, thinly sliced
2 teaspoons dried oregano
2 pints cherry tomatoes, halved
Coarse salt and ground pepper
1 1/2 pounds peeled and deveined large frozen shrimp, thawed, tails removed
2 tablespoons chopped fresh fresh mint, plus more for garnish
4 ounces feta cheese
Directions
Preheat oven to 475 degrees with rack set in upper third. Heat oil in a large skillet over medium. Add scallions, garlic, and oregano; cook, stirring, until fragrant, about 1 minute.
Add tomatoes. Cook over medium, stirring occasionally, until no liquid remains in skillet, 10 to 15 minutes. Season with salt and pepper.
Add shrimp and mint to skillet. Stir to combine; transfer to an 8-inch square (or other shallow 2-quart) baking dish. Crumble feta over top.
Bake until liquid is bubbling, cheese is beginning to brown, and shrimp in center of dish are opaque, 15 to 20 minutes.
Wednesday, December 3, 2008
Delish Chicken Tortellini Florentine Soup
Hey guys!!
I just discovered the most amazing recipe for a quick and easy weeknight soup that is sure to satisfy!
Chicken Tortellini Florentine Soup
1 32 oz box chicken broth
2 14 oz cans chicken broth
1 10 oz container refrigerated Alfredo pasta sauce
2 9 oz packages refrigerated three cheese tortellini
1 7 oz jar sun dried tomatoes (cut into strips)
1 package Perdue Short Cuts (Original flavor, diced)
3 cups baby spinach
In a stock pot add the chicken broth and pasta sauce, stir well. Add tortellini, tomatoes, and chicken and cook until pasta is tender but do not boil broth. Add in spinach and cook for a couple of minutes until spinach is wilted. Serve with a sprinkling of parmesan cheese.
This was an incredibly delicious soup that I will definitely make again and again!
L.
I just discovered the most amazing recipe for a quick and easy weeknight soup that is sure to satisfy!
Chicken Tortellini Florentine Soup
1 32 oz box chicken broth
2 14 oz cans chicken broth
1 10 oz container refrigerated Alfredo pasta sauce
2 9 oz packages refrigerated three cheese tortellini
1 7 oz jar sun dried tomatoes (cut into strips)
1 package Perdue Short Cuts (Original flavor, diced)
3 cups baby spinach
In a stock pot add the chicken broth and pasta sauce, stir well. Add tortellini, tomatoes, and chicken and cook until pasta is tender but do not boil broth. Add in spinach and cook for a couple of minutes until spinach is wilted. Serve with a sprinkling of parmesan cheese.
This was an incredibly delicious soup that I will definitely make again and again!
L.
Friday, October 24, 2008
Cholula Original Seasoning

In my chili recipe below, I mention the use of Cholula Seasoning. Please note that I am not meaning the Cholula hot sauce. The hot sauce is phenomenal but it's not the flavor you're looking for in the chili. Definitely invest in a bottle of this stuff....it's amazing on everything.
L.
Thursday, October 23, 2008
The Most Amazing Chili Ever!
I created what I believe is the most amazing chili ever. It topped any pot of chili I've ever made and I have decided that you are all worthy of the recipe. :-)
Laura's Amazingly Easy Chili
2 lbs ground chuck
1 large onion, diced
1 Tbs kosher salt
1 Tbs chili powder
1 Tbs Cholula Seasoning - Original
2 tsp cumin
2 tsp garlic powder
2 cans Del Monte diced tomatoes - Zesty Chili Style
1 box Pomi strained tomatoes
1 can Luck's beans - Pintos and Northern Beans
In a large Dutch Oven, brown ground beef with the onion, salt, chili powder, Cholula, cumin and garlic powder. Once completely browned, drain the meat well and return to the pot. Add the two packets of chili seasoning and stir until completely mixed into the meat. Add the diced tomatoes and the strained tomatoes and the beans. Stir until well combined. Simmer on medium-low about 30 minutes and enjoy!
Now that we're getting into cold weather season, I believe I'll be making this alot. I will say that the seasoned diced tomatoes really were the ticket to this quick chili tasting like it had been simmering for hours.
Laura's Amazingly Easy Chili
2 lbs ground chuck
1 large onion, diced
1 Tbs kosher salt
1 Tbs chili powder
1 Tbs Cholula Seasoning - Original
2 tsp cumin
2 tsp garlic powder
2 packets McCormick Chili Seasoning
2 cans Del Monte diced tomatoes - Zesty Chili Style
1 box Pomi strained tomatoes
1 can Luck's beans - Pintos and Northern Beans
In a large Dutch Oven, brown ground beef with the onion, salt, chili powder, Cholula, cumin and garlic powder. Once completely browned, drain the meat well and return to the pot. Add the two packets of chili seasoning and stir until completely mixed into the meat. Add the diced tomatoes and the strained tomatoes and the beans. Stir until well combined. Simmer on medium-low about 30 minutes and enjoy!
Now that we're getting into cold weather season, I believe I'll be making this alot. I will say that the seasoned diced tomatoes really were the ticket to this quick chili tasting like it had been simmering for hours.
Thursday, August 21, 2008
You only came for the food?
Shooter and I host our church small group at our house on Wednesday evenings. We had taken the summer off but started back last week. I didn't make my normal start of the series dip, I tried something new that was AWE.SOME! I also made up a recipe for last night that was a hit too. Unfortunately I have no pictures...but I do have recipes! That's what you came here for anyway, right? The food?
Hot Mexican Spinach Dip
1 (16 ounce) jar salsa
1 (10 ounce) package frozen chopped spinach, thawed and drained
2 cups shredded Monterey Jack cheese
1 (8 ounce) package cream cheese, diced and softened
1 (2.25 ounce) can chopped black olives, drained
1 tablespoon red wine vinegar
salt and pepper to taste
1 cup evaporated milk (optional)
Preheat oven to 400 degrees F (200 degrees C).
In a medium baking dish, mix together salsa, chopped spinach, Monterey Jack cheese, cream cheese, black olives, red wine vinegar, salt and pepper. Add milk a little bit at a time (if needed) until you get a nice creamy consistency.
Bake mixture in the preheated oven 12 to 15 minutes, or until bubbly.
So...I was on a spinach dip roll....I loved the mexican one so much that I thought, well, I'll tackle the Spinach Artichoke dip. I looked at scads of recipes, and no I don't know how many that is exactly, and couldn't find any without a gajillion (and yes, that's lots) of ingredients. I like it simple, man! So here's my easy, peasy take on Spinach Artichoke Dip, ladies and germs.
Laura's Easy Spinach and Artichoke Dip
2 10 ounce packages of frozen chopped spinach, thawed and drained well
1 14 ounce can of quartered artichoke hearts, chopped
1 16 ounce container of light cream cheese, softened
1 package of Hidden Valley Ranch dip mix
1 1/2 cups of italian cheese blend, divided
salt
pepper
1/4 tsp red pepper flakes
evaporated milk
Preheat oven to 400 degrees.
In a medium sized mixing bowl, combine together the spinach, artichokes and cream cheese. The mixture will be very thick. Add evaporated milk a little at a time until you reach a nicely creamy consistency that isn't runny but yet stirs easily (I added in about a 1/4 cup in all). Add in 3/4 cup of the italian cheese blend. Add salt and pepper to taste and red pepper flakes. Add in 2 tablespoons of the dip packet. Stir well and then transfer to an 8x8 baking pan.
Bake for approximately 20-25 minutes or until bubbly.
This is one of the best dips I've ever had. It's easy and it's so yummy!! I'm going to experiment with a little onion in it next time and see how that goes. Next week at small group, though, we're back to the Buffalo Chicken Dip...man that stuff is GOOD!!!! The recipe is here somewhere...I'm too lazy to link to it. Sue me!
Later lovelies!
L.
Hot Mexican Spinach Dip
1 (16 ounce) jar salsa
1 (10 ounce) package frozen chopped spinach, thawed and drained
2 cups shredded Monterey Jack cheese
1 (8 ounce) package cream cheese, diced and softened
1 (2.25 ounce) can chopped black olives, drained
1 tablespoon red wine vinegar
salt and pepper to taste
1 cup evaporated milk (optional)
Preheat oven to 400 degrees F (200 degrees C).
In a medium baking dish, mix together salsa, chopped spinach, Monterey Jack cheese, cream cheese, black olives, red wine vinegar, salt and pepper. Add milk a little bit at a time (if needed) until you get a nice creamy consistency.
Bake mixture in the preheated oven 12 to 15 minutes, or until bubbly.
So...I was on a spinach dip roll....I loved the mexican one so much that I thought, well, I'll tackle the Spinach Artichoke dip. I looked at scads of recipes, and no I don't know how many that is exactly, and couldn't find any without a gajillion (and yes, that's lots) of ingredients. I like it simple, man! So here's my easy, peasy take on Spinach Artichoke Dip, ladies and germs.
Laura's Easy Spinach and Artichoke Dip
2 10 ounce packages of frozen chopped spinach, thawed and drained well
1 14 ounce can of quartered artichoke hearts, chopped
1 16 ounce container of light cream cheese, softened
1 package of Hidden Valley Ranch dip mix
1 1/2 cups of italian cheese blend, divided
salt
pepper
1/4 tsp red pepper flakes
evaporated milk
Preheat oven to 400 degrees.
In a medium sized mixing bowl, combine together the spinach, artichokes and cream cheese. The mixture will be very thick. Add evaporated milk a little at a time until you reach a nicely creamy consistency that isn't runny but yet stirs easily (I added in about a 1/4 cup in all). Add in 3/4 cup of the italian cheese blend. Add salt and pepper to taste and red pepper flakes. Add in 2 tablespoons of the dip packet. Stir well and then transfer to an 8x8 baking pan.
Bake for approximately 20-25 minutes or until bubbly.
This is one of the best dips I've ever had. It's easy and it's so yummy!! I'm going to experiment with a little onion in it next time and see how that goes. Next week at small group, though, we're back to the Buffalo Chicken Dip...man that stuff is GOOD!!!! The recipe is here somewhere...I'm too lazy to link to it. Sue me!
Later lovelies!
L.
Thursday, April 10, 2008
Shrimp and Grits....yummmmmm.....
Okay...for ya'll non-Southerners who happened by my blog yesterday, you were probably a bit surprised and perhaps nonplussed at my photo of shrimp and grits. To many, those items just don't go together. Well, dear ones, here in the South they do! Apparently Southerners are different from other folks in the country because we tend to like our grits in a savory fashion. I, along with many others, just can't possibly stand the idea of putting sugar or syrup or honey on my grits. BLECH! No sir, give me some cheese, butter and Texas Pete and I'm good to go!
Shrimp and grits was a new one on me though. Shrimp...YES! Grits....Absolutely YES! Together....yea, not so sure about that. I discovered the lovely bowl of heaven once I moved to Atlanta, so it's definitely NOT a Tennessee thing. It's a low country thing...which means coastal South Carolina and coastal Georgia. It is surprisingly easy to make and here is the recipe.

Laura B's Shrimp and Grits
Grits:
3 Cups cold water
3 Cups cold water
2 Cups white, stone ground grits (NOT Instant)
1 Tbs salt
several pats of butter (unsalted)
1/2 Cup milk (I used skim milk)
1 1/2 Cups of shredded cheddar cheese
Shrimp:
1.5 pounds of peeled and deveined shrimp (I used 26-30 count shrimp)
1 small sweet onion, diced finely
1 Tbs minced garlic (I used the kind in a jar, hence the tablespoon measure)
2 Tbs olive oil
2 Tbs + 1 Tbs butter (unsalted) - divided
salt and pepper to taste
4 Tbs chicken stock
Start the grits first. In a saucepan, bring the water to a boil. Stir in the grits, whisking continuously. Stir in the salt. Lower burner to low heat and keep whisking the grits every minute or so. After 10 min, stir in a couple of pats of butter and about 1/3 of the milk. Stir in the cheese. Once cheese is melted, stir in more butter or milk based on how creamy/thick you like your grits. Remove from heat and cover.
For the shrimp, heat a skillet over medium high heat and add the olive oil and butter to the pan. When the butter is melted add the onion and saute for two minutes. Add the garlic, salt and pepper and saute for another two minutes. Once the onions are translucent, add the shrimp to the pan. Saute the shrimp until they just start turning pink. Add in the chicken stock and butter and allow sauce to reduce a little and the shrimp to cook through, stirring occasionally so that the shrimp cook evenly.
Best to serve this in shallow soup bowls. Ladle in some of the cheese grits and then spoon the shrimp and "gravy" over the grits. Add a few dashes of hot sauce, if you're so inclined. Then enjoy!!! I wouldn't be surprised if you bust out the Southern Drawl after eating a bowl of this deliciousness!
This will serve 4 adults.
If you've never worked with uncooked shrimp still in the shell, you definitely need to know how to devein the shrimp. Shrimp have a vein that run along their backs that is their digestive tract. Yup...you wanna remove that sucker before cooking. Here's a short video that I found that shows you exactly how it's done:
Subscribe to:
Posts (Atom)